Snagit is more than a screenshot tool – it’s a visual communication platform. With it, you can capture your screen in different ways, annotate the captures, combine them into guides, and even extract text from images. Whether you are documenting a bug, preparing a presentation, or creating a tutorial, Snagit saves time by giving you everything in one place.
Unlike free tools like Lightshot, Greenshot, or the built-in Windows Snipping Tool, Snagit focuses on professional results. It’s designed for people who need clarity, precision, and quick sharing in their daily workflow.
Table of Contents
Installing Snagit (Windows / macOS)
Getting started with Snagit is simple:
- Visit the official TechSmith Snagit website.
- Download the version for your system (Windows or macOS).
- Run the installer and follow the on-screen instructions.
- Snagit usually offers a 15-day free trial, after which you’ll need to purchase a license.
Once installed, Snagit will sit in your taskbar or menu bar, ready to launch at any time.
How to Take a Screenshot in Snagit
Snagit provides multiple capture modes: Region, Window, Full Screen, and Scrolling Capture. Each one serves a different need.
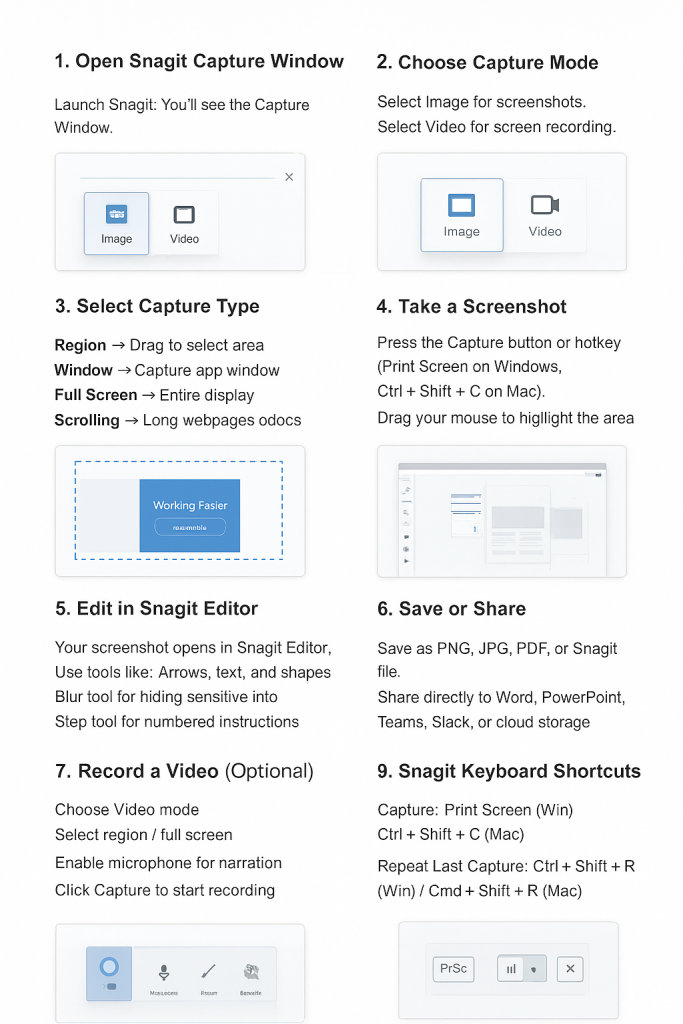
1. Open Snagit Capture Window
Launch Snagit, and you’ll see the Capture Window with three main options: Image, Video, and All-in-One.
2. Choose Image Capture
Select Image mode for static screenshots.
- Region → drag your cursor to select a portion of the screen.
- Window → capture a single app window.
- Full Screen → grab everything on your display.
- Scrolling → capture entire webpages, long PDFs, or chat conversations.
3. Take the Screenshot
Click the Capture button or use the default hotkey (Print Screen on Windows or Control + Shift + C on Mac). Highlight the area or select the window you want.
4. Edit in Snagit Editor
Every screenshot automatically opens in the Snagit Editor. Here you can:
- Add arrows, text, and shapes.
- Use the Step Tool for creating numbered instructions.
- Apply the Blur Tool to hide sensitive information.
- Use Stamps, Callouts, and Templates for professional visuals.
5. Save or Share
Snagit supports saving in multiple formats like PNG, JPEG, PDF, or SNAG (editable project file). You can also share directly to Word, PowerPoint, Outlook, Teams, Slack, Dropbox, and Google Drive with a single click.
How to Record Video with Snagit
Screenshots are just half the story. Snagit also includes video recording capabilities.
- Open Snagit and select Video mode.
- Choose whether you want to record a region or your full screen.
- Enable your microphone if you need narration.
- Press Capture to start recording your actions.
- Click Stop when finished.
- The recording opens in Snagit Editor, where you can trim unwanted sections and export it as MP4, GIF, or upload directly.
This feature is especially useful for creating tutorials, walkthroughs, or short explainer videos.
Special Features of Snagit
Snagit stands out because of its unique, productivity-focused features:
- Scrolling Capture – capture entire webpages or long documents that don’t fit on the screen at once.
- Text Capture (OCR) – extract editable text from images or screenshots.
- Templates – instantly create step-by-step guides from multiple images.
- Combine Images – merge several screenshots into a single workflow image.
- Snagit Library – automatically organizes captures by date, app, or tag for easy retrieval.
These features save hours of work compared to stitching screenshots manually or typing text out by hand.
Snagit Keyboard Shortcuts
To speed up your workflow, Snagit provides handy shortcuts:
- Capture Hotkey: Print Screen (Windows) / Control + Shift + C (Mac).
- Repeat Last Capture: Ctrl + Shift + R (Windows) / Command + Shift + R (Mac).
- Copy to Clipboard: Ctrl + C (Windows) / Command + C (Mac).
Shortcuts can be customized in Snagit’s Preferences to fit your style.
FAQs
| Problem | Solution |
|---|---|
| Snagit hotkey not working | Check if another app (like OneDrive or Dropbox) is using the same hotkey. Adjust in Snagit preferences. |
| Scrolling capture fails | Switch to Panoramic Capture, which works better on dynamic websites. |
| Video recording laggy | Lower resolution or frame rate; close unnecessary apps. |
| OCR text not accurate | Install the correct language pack. Works best with clear fonts. |
| Snagit won’t open on Mac | Go to System Preferences > Security & Privacy and grant Snagit screen recording permissions. |
Snagit on Windows vs. macOS
- Windows: Snagit integrates deeply with apps like Chrome, Edge, Word, and Excel, making scrolling capture more reliable.
- macOS: Works seamlessly with Finder, Preview, and Apple ecosystem tools, though scrolling capture may occasionally be less consistent.
Both platforms offer nearly identical editing tools, so you won’t miss out regardless of which OS you use.
Conclusion
Snagit is far more than just a screenshot tool—it’s a professional-grade solution for visual communication. From capturing simple images to recording full tutorials, from annotating screenshots to extracting text, it offers everything you need in one application.
If you’re a teacher creating guides, a business professional documenting processes, or a content creator producing tutorials, Snagit will save you time and deliver polished results.
While it comes at a cost after the trial, the productivity gains and professional features make it one of the best investments for anyone who works with visuals on a regular basis.